Pages

Friday 6 December 2013

About The Google Humming Bird Update

The hummingbird is a completely new algorithm that approaches the search engine queries in a completely intelligent as well as in a brand new way by using all the new technology along with the old features of all the existing algorithms. This algorithm of Google is named after the accuracy and the speed of the tiny hummingbird.

With all those intelligent changes made during the Panda and Penguin updates, the latest humming bird update was the way to smarten up the search engines to answer the questions and to check the context instead of only seeing the typed words within query as the separate entities. As a whole, this thing means that hummingbird is quite more advanced than the previous 
 
algorithms like Panda or Penguin. Hummingbird uses the search engine queries by using the long tail keywords and this algorithm also decipher of the contexts of the questions instead of chasing the particular keywords within any question. The goal of this task is to offer accurate answers of the questions.Besides, Hummingbird also allows the Google search engine to do the job better through the improvement in the semantic searches. As the traditional search becomes a norm, this Google algorithm lends the understanding to all the contextual and intent meaning of the terms used in any query.

The hummingbird has not yet affected the SEO. So, the companies can still improve their rankings in the search engines by applying the white hat methods of SEO as well as by providing the original contents. Till now, this algorithm is only applied to Google Chrome.

To conclude with, Hummingbird is a wonderful move for the search results and it can also be the perfect method for all the websites to get more visibility in the search engine rankings by focusing mainly on the users and the contents.

Tuesday 16 July 2013

How To Generete XML Sitemap on Blogger


XML or Google sitemap is too much essential for blog which helps search engine crawlers to crawl or index easily. To do XML sitemap for blogger follow below steps :

To generate XML sitemap for your blogger entre your blog URL in this site http://ctrlq.org/blogger/


Ater that copy the generated text from the box.

Now log in to your blogger, go to dashboard, select your blog and go to search preference in settings.
Then you can see Enable custom robots.txt content? Select Yes and paste the content which you have generated.
After that save it.

Saturday 29 June 2013

Add Meta Tags On Your Blog

Meta tags are very important part of our blogs. Adding meta tags you can get more traffic from different search engines. Meta tags communicates with the search engines and describes about your site to index correctly.

How to Add Meta Tags on Blogger

First log in to your blogger

Go to Template --> Edit HTML of your blog.
Find the code to press Ctrl + F

<b:include data=’blog’ name=’all-head-content’/>

Now paste the below code just after the above code.

<meta content='DESCRIPTION HERE' name='description'/>

<meta content='KEYWORDS HERE' name='keywords'/>
 <meta content='AUTHOR NAME HERE' name='author'/>


Now replace this your meta tags of your blog 
Write your blog description
Write the keywords of your blog
Write the author's name (your name)
Finally save your blog Template.

How To Add Different Meta Tags On Different Blogger Post

Using Same meta tag of your blog is good and get traffic little bit. But if you can use different meta tags for different blogger posts it's more effective.By this search engines knows more about your post, make them crawl and index your blog pages which improves search engines ranking.

Now we see what to do for this

Log in your Blogger dashboard --> Layout --> Edit HTML
If you have 50 posts in your blog then you have to paste the below code for 50 times.
Find the code

<b:include data=’blog’ name=’all-head-content’/>

And paste the below code just after the above code.

<b:if cond=’data:blog.url == “Your Blog URL”‘>
 <meta content=’Write some Description For Your Blog’ name=’description’ />
 <meta content=’A Few Keywords For Your Blog’ name=’keywords’ />


</b:if>
 <b:if cond=’data:blog.url == “Your Post URL"‘>
 <meta content=’Write some Description For Your Blog Post' name=’description’ />
 <meta content=’A Few Keywords For Your Blog Post’ name=’keywords’ />


</b:if>

 <b:if cond=’data:blog.url == “Your Post URL”‘>
 <meta content=’Write some Description For Your Blog Post' name=’description’ />
 <meta content=’A Few Keywords For Your Blog Post’ name=’keywords’ />

</b:if>
And save the template.

Wednesday 12 June 2013

How To Add Your Twitter Timeline Widgets On Different Blogs


Adding the Twitter Timeline is very Easy. To add this timeline your blog will be more attractive and by this timline user can follow and also can tweet to you directly from your blog. To add this widgets at first you have to need to create twitter widget on your twitter account. For this you will need to do the following steps -

Log in to your Twitter account and go to your setting page.

Now go to widgets and click on “Create new”.
After click this button you can see Configuration on your screen.

Now there are different options like Username , Height , Theme , Link Color. Now you need to fill up these options as your require.
Now saved your widgets to click the “Create Widgets".
Then copy the HTML code provided by Twitter. 

What to do to add this widgets on your blogger
Log in your blogger and go to Layout , click on “ Add a Gadget” and choose HTML/ JavaScript widget from the list.

Paste the particular HTML code and save it.
Now open your blog you can see the widgets on the side bar. 

For Wordpress users:
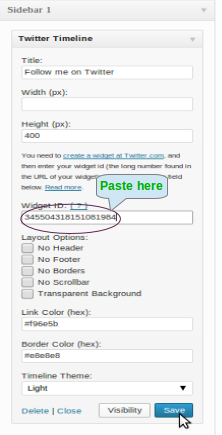
Add the Twitter widgets on Wordpress you have to need to create widgets from Twitter as same as previous. Here you need to copy only the Id which is long numbers. It will look something like this in your post.

Then log in your Wordpress Account and go to Dashboard => Appearance => Widgets. Now choose Twitter Timline and drag it to sidebar. 
 
Now You have to need fill up all the field as your choice and save it.
View the blog , you can see your timeline.